MP3 Player
The Embedded-Adventures MOD-1021 MP3 Output Module
Ready-built MP3 Player shields for the Arduino tend to be quite expensive and, as the are shields, don't easily lend themselves to being used in projects which are built with "bare-bones" ATmega328 or ATtiny microcontrollers. Most projects - especially those intended for battery operation - can do without the extra current-consumption of the voltage regulator and the RS232-TTL hardware associated with a standard Arduino board.
I was, therefore, pleased to come across a small MP3 Player Module without all the "baggage" associated with an Arduino shield: The SoundOut MP3 Audio Module from Embedded Adventures.
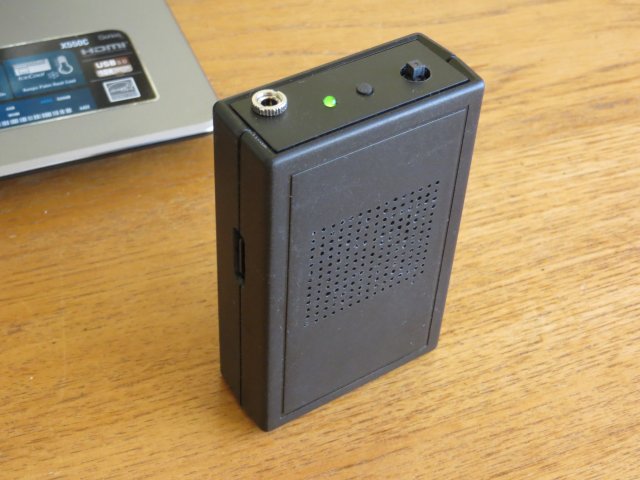
In it's most basic configuration, the player only needs a few push buttons and an 8 ohm speaker to be up and running, playing MP3 files from a micro-SD card. In fact, except for one or two niggles, this most basic configuration is all I really needed from a player that I could shove in my pocket and not worry about scratching or even losing...
The most objectionable problem with simply using push buttons to control the module is that its volume defaults to maximum when power is applied. Also, there's no way (that I can find) to set the equalizer from hardware swiches. As the module has a 6-stage equalizer (Normal/ Pop/Rock/Jazz/Classic/Base), it seems a shame not to use it.
The best way to address these problems seems to be with a microcontroller which can save and restore the values for the volume and the equalizer in a couple of EEPROM locations.
Once a micrcontroller is involved, the temptation is to start adding all sorts of bells and whistles, LCD screens, and so on! However, I was determined this project would be built as "basic" as possible so I ditched the ATmega328 controller in favour of an ATtiny84. The ATtiny has enough IO to accomodate a 5-way Navigation switch (for Play/Restart, Next, Previous, Volume Up and Volume Down), a separate button for the Equalizer and a Busy LED as well as a couple of IO pins for the internal "communications" between the ATtiny84 and the MP3 module.
I found some of the communications a bit "quirky". Requesting the current volume level and the currently-playing track worked as expected but requesing the total number of files on the micro-SD card always returned '1'.
Communicating with the MOD-1021 MP3 Module
The module uses a simple 9600 Baud serial TTL-level communication. As the datasheet suggests, this should be at 3.3 volts or, at the very least, use 1k series resistors if running at 5 volts. As I was building a portable project to be run off a PP3 9-volt battery, running the entire circuit at 3.3 volts with a low-current 3.3 volt regulator would be straightforward.
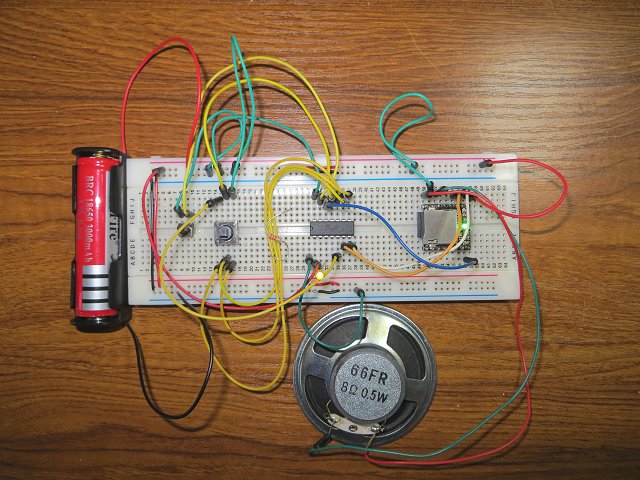
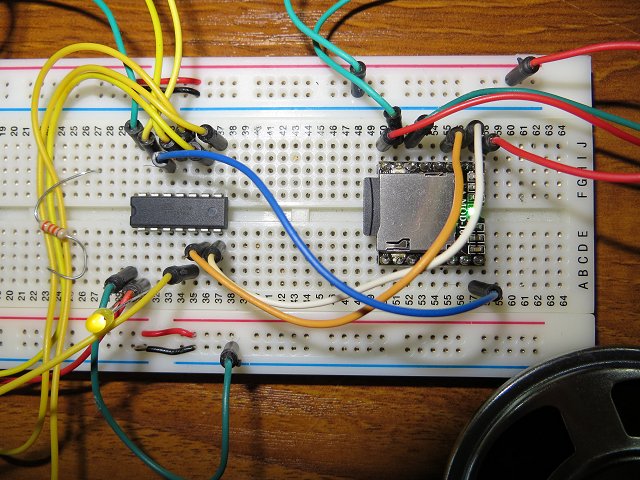
These two photos show all that's needed to get the module working with an ATtiny84. In addition to Vcc and Ground, the only connection required between the ATtiny84 and the MP3 module is the serial Tx out (from the ATtiny84) to serial Rx in to the MP3 module - the white wire in this breadboard mock-up.
The orange wire is for communication from the MP3 module back to the ATtiny84. Although I haven't used it in the software shown here, it makes sense to include the connection for possible future use. The module can answer queries such as the currently-playing track number, the total number of tracks, etc, which would be more useful in a project which had some sort of display.
As the MP3 module provides a 'Busy' signal when it's playing a file, I used that to let the ATtiny84 know (via the blue wire) so it can light an LED. The module itself has a green LED but, as I didn't know at this stage whether it would be visible from outside the intended enclosure, I assigned two ATtiny84 IO pins just in case they were needed.
Incidentally, the Embedded Adventures datasheet shows the module's 'Busy' signal as HIGH when a file is playing whereas, it's actually LOW. The datasheet has no electrical specifications so I preferred NOT to attempt to drive an LED directly from this signal.
The module seems to be a re-badge or clone of one available from some Chinese stores. Obviously, the module from a UK supplier is far more convenient, especially as the price is, unusually, pretty-much the same. The Chinese datasheet does go into a bit more detail about the communications and shows a few more hardware connection options so is probably worth a look.
Software
The serial communications consists, generally, of sending a 10-byte data string, details of which are shown in the datasheets. Although an Arduino library is available from the Chinese supplier, it seems to be incomplete and, in any event, I found the communications easier to understand by building the necessary 10-byte data strings within the main code rather than messing with a library.In additio to the more obvious commands, such as Play, (Pause), Previous, Next, Volume Adjust and so on, there are commands to select folders, jump directly to track numbers and so on. I couldn't get a some of these to work in the way I'd expected but, as I only needed the basic ones for my purposes, it wasn't a problem to me. To build a more "up-market" player, say with an LCD display, some of the more advanced commands could be useful -- They may work with a bit more time devoted to them - for example, the order in which they're sent to the module may be important.
The software I've written simply repeats through the entire MP3 file-list regardless of whether they're grouped in folders. I just want something that keeps playing while walking without constantly having to play with track-selection but it does have Repeat-Play, Previous, Next and Volume Adjust on a 5-way "joystick". I couldn't get Pause to work in repeat mode - it just acted like Stop so I didn't include it. Because of the relatively high standby current taken from the battery, I didn't want the finished project to be left on Standby accidentally so opted to switch the power to OFF to stop it playing.
All the command options are fairly obvious in the datasheet and, hopefully, I've made the software commented enough to be able to have a go at adding more commands if you feel so inclined.
The software compiles and runs "as is" in both the ATmega328 and the ATtiny84, with the exception of a couple of pin-swaps for the Tx and Rx. The ATtiny84 uses D0 and D1 for these. The ATmega328 would be better using different pins as D0 and D1 are the usual Arduino programming pins which tend to "get in the way" if the pins are used for something else.
I tried putting the ATtiny84 and the MP3 module into sleep mode, instead of using a power on-off switch, but the current was still a bit too high and, having put the MP3 module in low-power mode, I couldn't see how to get it back into normal mode without powering it off anyway.