Credits & References
Suppliers
Nokia 5110 Breakout Board.
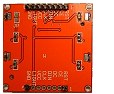 I used this supplier. Unfortunately,
their location may make delivery unpredictable. It's the only board that I know works at 4.2 volts and my PCB
layout is designed for this display. The LED backlight is active low.
I used this supplier. Unfortunately,
their location may make delivery unpredictable. It's the only board that I know works at 4.2 volts and my PCB
layout is designed for this display. The LED backlight is active low.Other suppliers, which you'll need to test out for yourself, are:
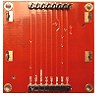 this one
appears NOT to have any LED current limiting. I've run it at 4.2 volts. The contrast setting at this voltage seems to be 'unstable' but
this may just be a problem with the display I have. This PCB layout (with the parallel tracks) seems to be the one commonly available with most
suppliers. I increased the LED backlight series resistor to 330R for this one.
this one
appears NOT to have any LED current limiting. I've run it at 4.2 volts. The contrast setting at this voltage seems to be 'unstable' but
this may just be a problem with the display I have. This PCB layout (with the parallel tracks) seems to be the one commonly available with most
suppliers. I increased the LED backlight series resistor to 330R for this one.
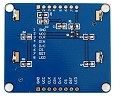 and this one, from Adafruit, which the supplier
seems fairly adamant needs a 3.3 volt Vcc supply.
and this one, from Adafruit, which the supplier
seems fairly adamant needs a 3.3 volt Vcc supply.
The LEDs in this version are driven via a transistor.
The Adafruit board is slightly wider than the other two and probably would not fit alongside the navigation switch in the enclosure that I've used.
7-Function Navigation Switch
I used this one from Farnell. It's black despite the colour shown on the Farnell website.An alternative may be a 5-way navigation switch such as this one plus two basic tactile switches to adjust the sensor sensitivity.
The Enclosure
I used this one also from Farnell. Cases are always the Achilles' Heel of home construction! The one I chose resulted in a convenient, portable unit but its small size limited the options for the battery and made construction difficult. With hindsight, I think I would have looked harder to find something slightly larger!
The PC Flash Socket
PC, short for Prontor-Compur. Quite expensive and difficult to source. This was the only supplier I could find. The socket is good quality but no solder tag was provided for the ground connection.
The Photodiode
I used this one. I intend to have a play with this one at some point. It's large surface should make it extremely sensitive.
3.5mm Stereo Sockets
I used two of these should you wish to ensure the PCB layout I've used matches the sockets.
Lithium-Polymer Battery
www.technobotsonline.com/lipo-polymer-lithium-ion-battery
Lithium-Polymer Battery Charger
Lithium-Polymer Battery Charger
Credits
Thanks to members of the Arduino Forum for their help sorting out the power supply and for helping with a programming issue.