The Photo Sensor - Part 2
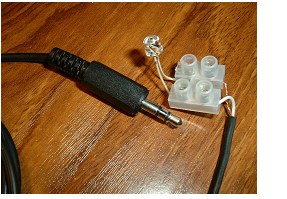
By wiring a photodiode between the tip and ground of a 3.5mm plug and connecting it to the MIC input on the computer's sound card, it's possible to use Audacity to record the flashes from the camera's flashgun.
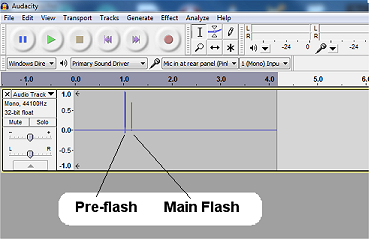 In this first image, you can see what appears to be one pre-flash and the main flash from my Nikon D3100.
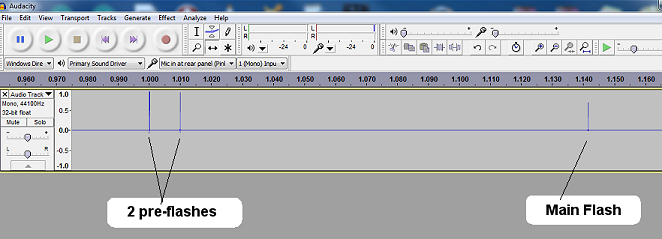
By expanding the timeline in Audacity, we can see there are, in fact, two pre-flashes spaced 10ms apart. The main flash
follows just over 130ms later. (See the image below):
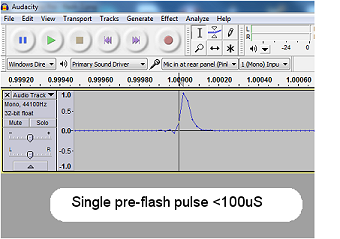 By expanding the Audacity timeline even further, we can see that the duration of
a single pre-flash is around 100µs.
By expanding the Audacity timeline even further, we can see that the duration of
a single pre-flash is around 100µs.
Some experimenting is necessary to make sure the ATmega328 is going to be fast enough to catch these very short pulses. For certain, the ATmega328 code will need to be short and sharp devoting most of its attention to capturing the pulses without meandering around, taking the scenic route unnecessarily monitoring switches and the like.
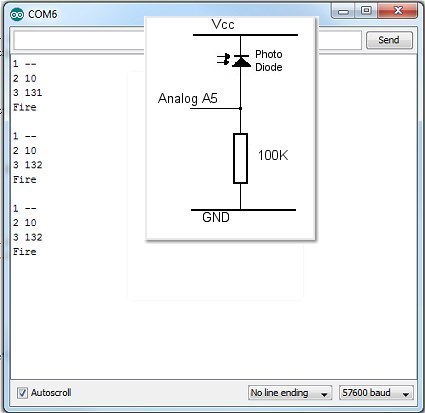
This short Sketch for the Arduino is used to catch the flashes from the camera by connecting a photodiode to Arduino pin A5.
As can be seen on the Serial Port Monitor,the interval between the 1st and 2nd pre-flashes is consistently 10ms and the interval between the second pre-flash and the main flash is around 131 or 132ms - exactly as recorded in Audacity!
// Defines for setting and clearing register bits
#ifndef cbi
#define cbi(sfr, bit) (_SFR_BYTE(sfr) &= ~_BV(bit))
#endif
#ifndef sbi
#define sbi(sfr, bit) (_SFR_BYTE(sfr) |= _BV(bit))
#endif

int ambient = 0;
int count = 0;


long  int time, lasttime, firsttime;

void setup() {
  analogReference(INTERNAL);

  // Set analog prescale to 16 for much faster analog read.
  sbi(ADCSRA,ADPS2);
  cbi(ADCSRA,ADPS1);
  cbi(ADCSRA,ADPS0);

  Serial.begin(57600);
  ambient = analogRead(5);
}

void loop() {
  firsttime = 0;
  ambient = analogRead(5);
  time = millis();
  while (analogRead(5) - ambient < 20);
  count++;

  while (analogRead(5) - ambient > 20);
  if (count == 2) firsttime = millis() - time;

  // If gap betwen 1st and 2nd pulse is > 250ms, assume 2nd pulse is main flash so Fire!
  if (firsttime > 250) {
    Serial.print(count);
    Serial.print(" ");
    Serial.println(firsttime);
    fire();

  } else {
    if ( (count > 1) && (millis() - time < 3 * firsttime) )lasttime = millis() - time;

    Serial.print(count);
    Serial.print(" ");

    (count == 1 ? Serial.println("--") : Serial.println(millis() - time));

    // If gap between previous pulse and current pulse is > (7 * previous gap) assume
    // current pulse is main flash and Fire!
    if (count > 1 && millis() - time > (lasttime * 7)) {
      fire();
    }
  }
}

void fire() {
    Serial.println("Fire");
    Serial.println();
    count = 0;
    firsttime = 0;
   lasttime = 0;
}
Triggering the Slave Flash
 As I mentioned at the start of this article, my interest in photography has re-kindled after a long break and the only separate
flashgun I have at present is an old SunPak Auto33.
As I mentioned at the start of this article, my interest in photography has re-kindled after a long break and the only separate
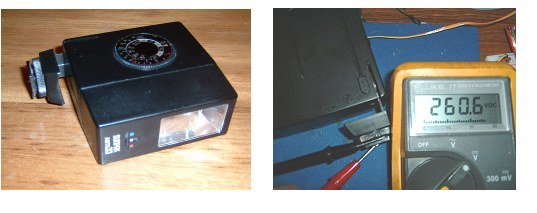
flashgun I have at present is an old SunPak Auto33. Before I attached it to the hotshoe of my new Nikon D3100, I thought it prudent to measure the volatge at the trigger contacts. Lucky I did!
As you can see from this photo, there's over 260 volts DC at the trigger contacts.... the Nikon is rated for a maximum of 250 volts. For comparison, I think Canon DSLRs are rated at 6 volts maximum.
Obviously, it's not safe to connect it directly to the Nikon's hot shoe and some care will need to be taken over selecting the
components for the camera controller's slave flash function.
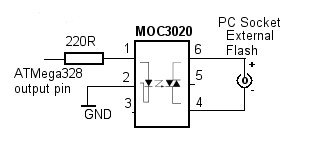 As with the shutter control, I've used an opto-isolator to keep the flashgun's potentially very high
voltage away from the camera controller circuitry. This time, I've used an MOC3020
as it's rated at 400 volts across its output pins when the device is "off" - hopefully enough for the oldest of flashguns!
As with the shutter control, I've used an opto-isolator to keep the flashgun's potentially very high
voltage away from the camera controller circuitry. This time, I've used an MOC3020
as it's rated at 400 volts across its output pins when the device is "off" - hopefully enough for the oldest of flashguns!
Care needs to be taken wiring the PC connector as they're not the easiest of sockets to connect to.
In the next section, we'll look at the full circuit schematic for the Camera Controller....