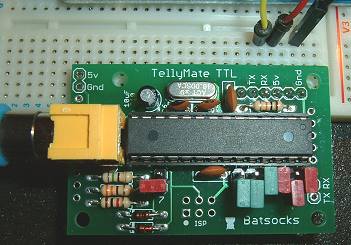
The Batsocks TellyMate
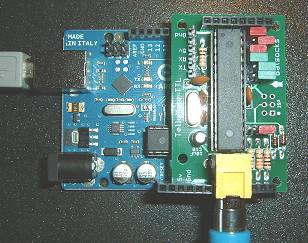
The Batsocks TellyMate is a small kit designed to take 5v TTL serial data and display it on a TV or any device with a Composite Video (AV) input.I bought the kit several months ago - before I was interested in the Arduino - so I bought the TellyMate TTL Kit rather than the version designed as an Arduino Shield.
All the components required are supplied, including, of course, the pre-programmed ATmega8 chip and its 16MHz crystal. The components are all good quality and the small PCB is screen printed, double sided with through-hole plating and is of excellent quality.
 |
|
Although the connectors "worked", I wasn't particularly happy with it. As the two piggy-backed boards automatically connect to both Tx pin and Rx pin on the Arduino, it was necessary to remove the TellyMate board every time I wanted to upload a new (or edited) sketch to the Arduino from the IDE - otherwise there was a good chance that data being uploaded to the Arduino would trigger the TellyMate to respond, upsetting the sketch uploading process. Also, as access to one end of the ATmega8 is restricted with the phono socket, the stackable socket that I'd fitted blocked access to the other end as well, making it virtually impossible to remove the chip should it ever be required.
As the vast majority of stuff I'd be doing didn't need any data to be sent back to the Arduino, piggy-backing the TellyMate on the Arduino proved more of an inconvenience than a benefit. All the required pins are brought out to header connections at the top right corner of the TellyMate board anyway, so I decided to remove the stackable sockets and just fit a 6-way male header strip on the underside in true "breakout board" style. 5v, Gnd and Rx (the Arduino's Tx) are the only connections required for most uses.
In use, the TellyMate behaves just like a serial terminal. Most of the control commands are VT52 compatible with some extra commands specifically tailored to the TellyMate. The following video starts with one such command - <esc> Q - which causes the TellyMate to display the configuration of its various jumper settings. The rest of the video is a simple demonstration of basic cursor-positioning commands - all very similar to the old VT52 "glass terminals" that I served my apprenticeship with!!
/* Basic TellyMate Demo. */

#define ESC "\x1B"
byte dx = 1;
byte dy = 1;
byte x = 18;
byte y = 1;

void cursorRowCol( byte row , byte col ) {
  Serial.print( ESC "Y" ) ;
  Serial.write((32 + row)) ;
  Serial.write((32 + col)) ;
}

void setup() {
  Serial.begin( 9600 ) ;
  randomSeed(analogRead(0));
  x = random(3, 30);
  y = random(2, 15);
  Serial.print(ESC "E");
  Serial.println("<ESC> \"E\" - Clear Screen");
  Serial.println( "Hello World!" ) ;
  Serial.print("<ESC> \"Q\" - Diagnostics");
  delay(4000);
  Serial.print(ESC "f");   // Cursor OFF
  Serial.print(ESC "Q");
  delay(5000);
}

void loop() {
  Serial.print(ESC "E");    // Clear screen
  Serial.write(201);        // print top left corner
  for (int i=0;i<35;i++)    // draw top of box
    Serial.write(205);
  Serial.write(187);        // print top right corner
  for (byte r=1;r<20;r++){
    cursorRowCol(r, 36);    // cursor row needs incrementing
    delay(10);
    Serial.write(186);      // draw right side vertical line
 }
 cursorRowCol(20, 36);
 Serial.write(188);         // print bottom right corner
 for (byte c=35;c>0;c--){   // step cursor backwards across screen
   cursorRowCol(20, c);
   delay(10);
   Serial.write(205);       // draw bottom line from right to left
 }
 cursorRowCol(20, 0);
 Serial.write(200);         // print bottom left corner
 for (byte r=19;r>=1;r--){
   cursorRowCol(r, 0);
   delay(10);
   Serial.write(186);       // draw vertical line upwards
 }
 cursorRowCol(y, x);
 Serial.write(254);         // print 'ball' in random position
 delay(100);
 while (1) {                // loop forever
   if (x > 34) dx = -1;     // check ball is in bounds
   if (y > 18) dy = -1;
   if (x < 2) dx = 1;
   if (y < 2) dy = 1;
   Serial.print(ESC "D");   // move cursor back one place to
   Serial.print(" ");       // erase current ball position.
   y += dy;                 // increment or decrement ball position
   x += dx;
   cursorRowCol(y, x);
   Serial.write(254);       // print ball in new position.
   delay(75);
 }
}