E-Paper Weather Monitor
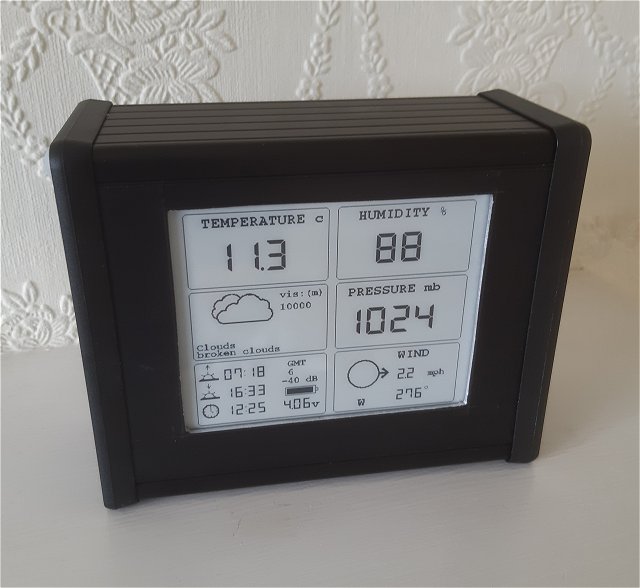
As e-paper continues to display its image even after its power supply is removed, it seems like a good choice for a project which spends most of its time powered down, asleep.
This weather monitor obtains its data from a publicly-accessible website: https://openweathermap.org, which is free to use (with some limitations). They only update the data for a given location every 10 minutes so there's little point in calling the server more frequently.
As internet access is obviously a prerequisite for the project, either an ESP8266 or an ESP32 WiFi module is the logical choice. After a few failed attempts to get my e-paper display to work with an ESP8266 module [a LOLIN (Wemos) D1 mini pro], I opted to use a LOLIN D32.
(Apparently, Wemos changed their name to LOLIN in an attempt to combat all the clones that are appearing on the market, so there is some interchangeability and confusion with the name).
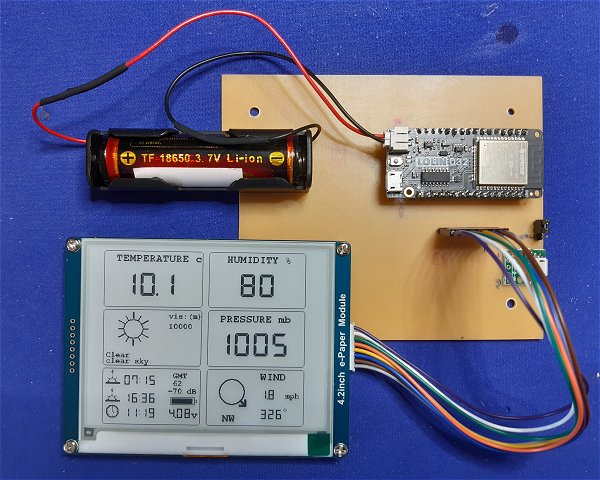
There are a few variations of the LOLIN/Wemos D32 module - some with a JST PH-2 battery connector and a 500mA 3.7v lithium charger/controller on-board. All of them will work with this project but I used the Wemos LOLIN D32 v1.0.0 module, mainly because it had a charge-controller and even an on-board voltage divider for measuring the battery voltage.
Connection Diagram

When the Wemos LOLIN D32 is in hibernation mode, the current taken from an 18650 Lithium battery is around 65 µA. Initially, I used a 2N7000 MOSFET to switch off
the power to the display while the circuit was sleeping but I could measure no discernible reduction in the current so I decided to leave the display permanently powered on.
The GxEPD Arduino library which drives the display contains wakeUp() and powerDown() functions anyway, which it calls when updating the display.
4.2inch-e-paper-specification.pdf,
The Arduino sketch arranges for the LOLIN D32 to wake briefly every 15 minutes to connect to the OpenWeather server and the current rises to around 95 to 100mA for approximately 6 seconds while the data is retrieved and the display updated. When the battery voltage drops below 3.5 volts, the sleep interval increases to every 30 minutes to conserve battery power.
At 3.3 volts and lower, to prevent damage to the battery, the interval increases to one year with a message to "CHARGE BATTERY" on the display - for all practical purposes, the LOLIN D32 no longer wakes up until the battery is charged and the LOLIN D32 is RESET.
Measuring the Battery Voltage
The LOLIN D32 v1.0.1 dedicates GPIO Pin 35 to measuring battery voltage as it's connected internally to the junction of two 100k resistors connected between the battery positive and ground. Very useful as it avoids unnecessary external resistors which could be prone to injecting extra noise into the ADC Pin.Other variants of the LOLIN D32 bring GPIO Pin 35 out to a header without the on-board 100k resistors so two 47k to 100k resistors would need to be connected externally.
A Second Weather Server
The jumper connected to GPIO Pin 32, in the connection diagram above, is to instruct the sketch to use a server other than the OpenWeather server.It is experimental and the second server must send its data in exactly the same format as the OpenWeather server. As I was able to simulate a second server at home, I found it useful while developing the sketch to avoid annoying the OpenWeather server with too many calls.
It does, however, come at a cost: As mentioned above, the sleeping current of the entire circuit is around 65 µA but that rises to 190 µA with the jumper closed. However, the sketch will automatically default to the OpenWeather server if the jumper isn't present so, for most people, it can just be ignored.
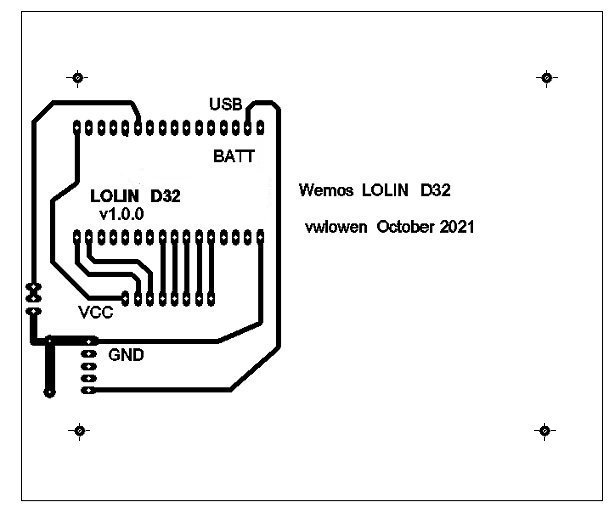
Printed Circuit Board
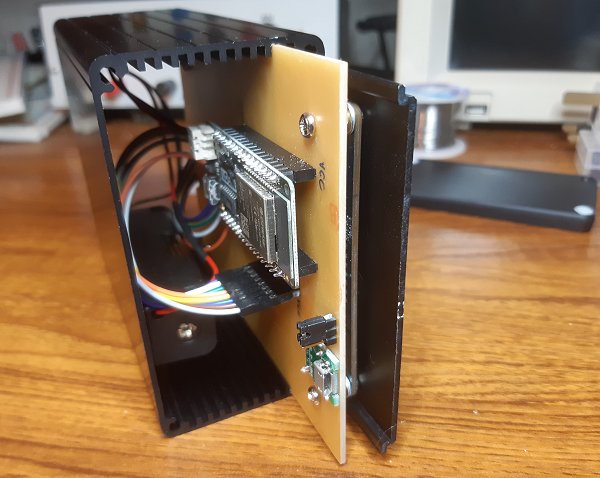
The circuit is so simple, it hardly justifies making a PCB but it does help to fit the display in an enclosure by attaching the display to the PCB which is sized to exactly fit the enclosure's internal slots.As I'm using a metal enclosure with plastic ends, the Wemos LOLIN D32 module is positioned to keep its antenna as close to the "outside world" as possible. Power to the module to charge the battery is through a separate micro USB socket. The USB socket on the module will only be used if/when the sketch needs re-programming.
The PCB layout is only for the particular header pinout arrangement of the Wemos LOLIN D32 v1.0.0 module.

| Waveshare 4.2 inch E-Ink Display (with connecting lead) | AliExpress |
| Wemos LOLIN D32 v1.0.0 | eBay |
| Hammond Enclosure. 120 x 103 x 53mm 1455N1202BK | CPC, Rapid Electronics |
| Micro-USB Breakout board | eBay |
| 100 x 160 FR2 PCB | Rapid Electronics |
Making the Bitmaps Char [] Array File
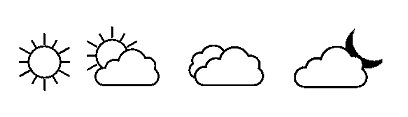 The project can display eleven bitmaps based on the Weather Icons suggested by the OpenWeather server. The server uses colour to distinguish between
day and night icons but, as the 4.2" e-paper display is monochrome, I've used a subset of the icons indicated by the OpenWeather server.
The project can display eleven bitmaps based on the Weather Icons suggested by the OpenWeather server. The server uses colour to distinguish between
day and night icons but, as the 4.2" e-paper display is monochrome, I've used a subset of the icons indicated by the OpenWeather server.
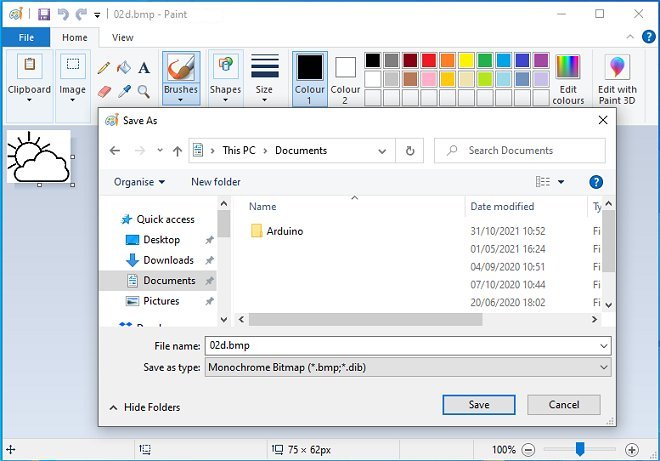
To design the icons, I used a very old version of Paintshop Pro but any paint program should do - Windows' Paint works fine. The icons' height and width can vary but keep them around 75 x 75 pixels. Crop the image tightly to avoid leaving any unnecessary "white space" around the image as it just wastes memory in the ESP32 module. Save them as Monochrome (or 1-Bit) bitmaps.
Each bitmap image now needs to be converted into a "char [] {}" array that the Graphics Library uses to draw the bitmap on the e-paper display.
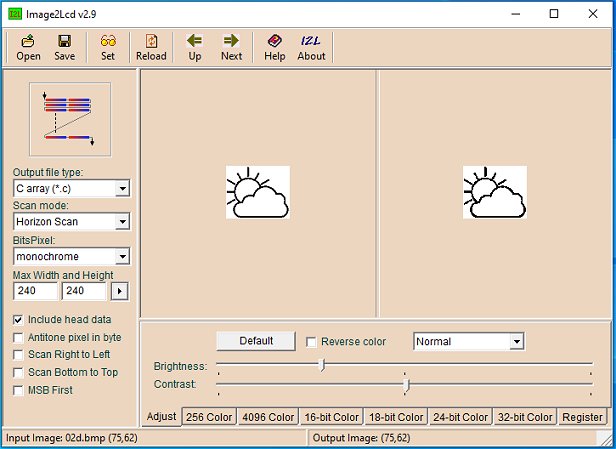
There are a few online tools to do the conversion but I prefer to use an application downloaded to my desktop. The one provided by Waveshare (who actually supply the e-paper display) works well. Download the zip file from https://www.waveshare.com/wiki/File:Image2Lcd.7z, extract the contents of the zip into a suitable folder and run Img2Lcd.exe. Click the Open button and open your weather icon bitmap.
The settings and checkboxes shown below work fine for me. Some people need to check the Reverse color checkbox or select Mirror Left-Right from the drop-down list. There may be a bit of trial and error so use whatever produces a correct image on the e-paper display.
When you click the Save button, you will be asked for a filename. I used the same names as the weather icon's IDs used by OpenWeather. For example: 02d for the "Day Icon with few clouds" icon. Save the file with the .c extension. The default action of Img2Lcd is to automatically open Windows Notepad to show the file. If Notepad doesn't open, click the Set button on the Img2Lcd toolbar.
I recommend that you copy the entire "char [] {}" array from Notepad, paste it into your favourite text editor and save it as a file called bitmaps.h. You can discard the Notepad version.
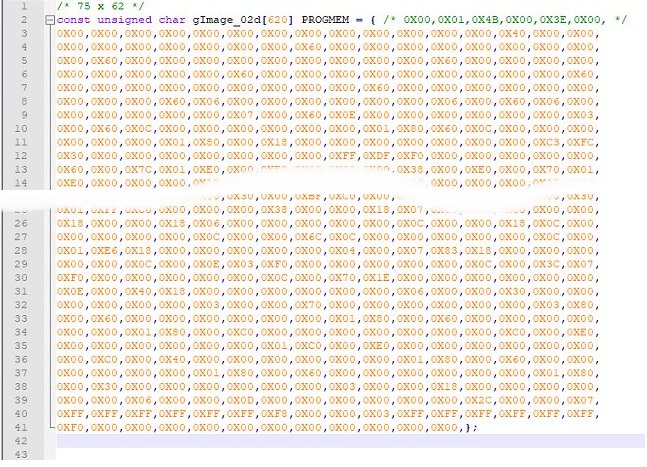
An example is shown below. Note that Img2Lcd added "gImage_" to form the Array name. Note also the addition of PROGMEM. I added that myself to load the array into PROGMEM although there's plenty of memory available in the LOLIN D32 module so it isn't strictly necessary. Note also that I added the comment /* 75 x 62 */ directly above the Array. That's the width and height of the image as noted in Img2Lcd. We need the size when we draw the image on the e-paper display so it's worth noting down the size for future reference.
For reference, the following line of code in the Arduino sketch displays the icon we've just made (x and y are the icon's position on the display and 75, 62 are the icon's width and height we noted previously. GxEPD_BLACK is the graphics library's code for black "ink").
display.drawBitmap(gImage_02d, x, y, 75, 62, GxEPD_BLACK); // Few clouds - day.That's one weather icon image in the bag, 10 more to go! The reason for copying and pasting the char array into yor own bitmaps.h file is now clear -- you can simply keep adding them to the end of bitmaps.h so you only need a single #include "bitmaps.h" in the Arduino sketch in order to be able to reference all of the bitmaps.
In addition to the 11 weather icons, there are 16 wind direction symbols (n, nne, ene, etc) and icons for the times of sunrise & sunset and the time the OpenWeather server last updated its data. They're all made in exactly the same way as described above with their char arrays tacked onto the end of the bitmaps.h file. The sketch below expects to find the file in its own folder inside the sketch's folder: {sketch_folder}/bitmaps/bitmaps.h
Creating New Fonts
Although a good selection of fonts is available to us through the Adafruit_GFX library (which the e-paper library uses), a couple of 7-segment fonts add to the appearance of the display. I'll explain where to get some suitable TrueType fonts and how to convert them into compatible Adafruit_GFX 8-bit integer arrays so the graphics library can use them.
Creating TrueType fonts from scratch is beyond the scope of this article (and me!) but I was surprised to find that a lot of free downloadable TrueType fonts are available on the internet. A Google search for free truetype fonts lists dozens of sites. I'd advise taking the usual care when downloading files from the internet: Don't download or run .exe or what claim to be self-extracting exe files.
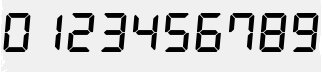
The 7-segment fonts I've used came from https://github.com/keshikan/DSEG/. Download the zip file and extract its contents to a suitable folder.
There are dozens of fonts to choose from and it may need some trial and error. I used DSEG7Classic_Bold20pt7b and DSEG7Classic_Bold8pt7b. 20pt and 8pt refer to the height of a character. Traditionally 1pt is 1/72 of an inch but, as display resolutions vary so much, well, that's where the trial and error comes in.
Converting a TrueType Font to an Adafruit Graphics Char Array
Obtaining suitable fonts is the first part of a two-part process. The data for each font now needs converting into an Adafruit_GFX integer array. The most straightforward way to do it is to visit https://rop.nl/truetype2gfx/.
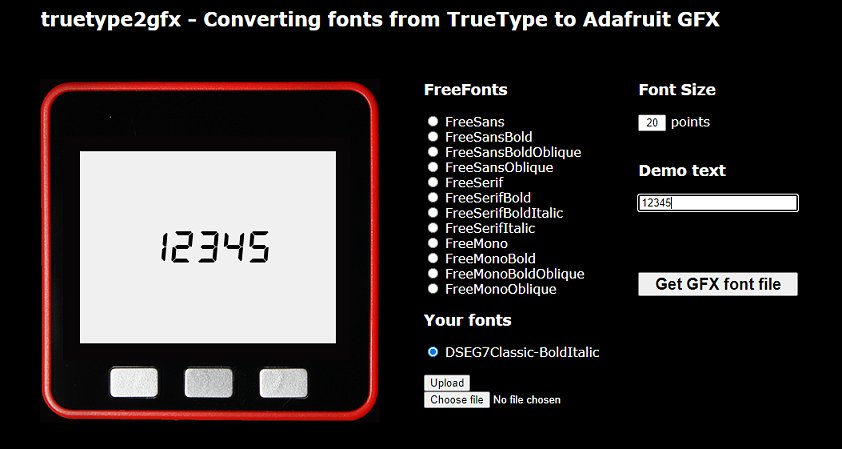
Click the Choose file button and select one of your downloaded TrueType fonts. Then click the Upload button. When the font file has uploaded, you can change the Font Size and type different Demo text. Click the Get GFX font file button when you're happy with the size - or choose a different font to upload.
You can add the GFX file to the Adafruit_GFX/Fonts/ folder or save it in its own folder inside the Arduino sketch folder: {sketch_folder}/myFonts/{font-name.h} - which is where the sketch below expects to find it.
Of course, truetype2gfx is also useful if you prefer to use an existing Freefont but want to change its size. I find that increasing the font size with the Adafruit GFX function setFontSize() often makes the font look "jagged".
On the truetype2gfx/ page there's a useful discussion about font height versus screen size and it's well worth reading.
Setting up the Arduino IDE
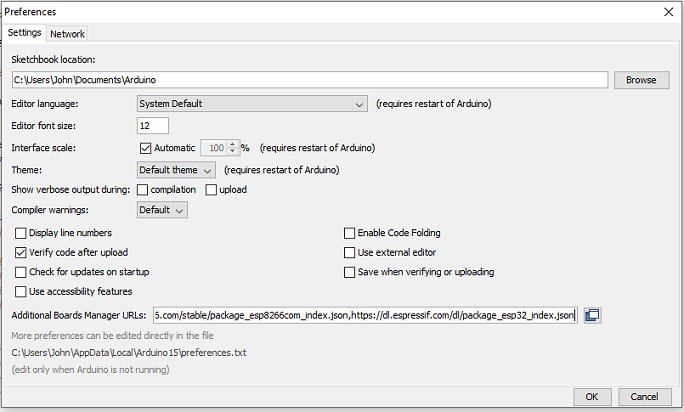
If you haven't used the ESP32 in the Arduino environment before, it's necessary to install the ESP32 Board definitions into the Arduino IDE.In the Arduino IDE, select File -> Preferences.
In the Additional Boards Manager URLs text box, enter: https://dl.espressif.com/dl/package_esp32_index.json then click the OK button.
If there's already an entry in the text box, separate them with a comma (,).
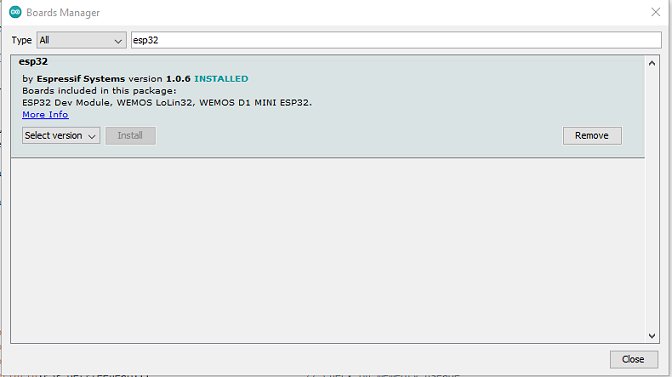
From the main Arduino IDE window, select Tools -> Board -> Board Manager...
Wait for the platforms index to download then scroll down the list to esp32 ( or type esp32 into the search box) and click Install.
Additional Libraries for the E-Paper Weather Monitor Sketch
The sketch also needs a few additional libraries as follows.
| E-Paper library | https://github.com/ZinggJM/GxEPD |
| Adafruit Graphics library | https://github.com/adafruit/Adafruit-GFX-Library |
| Time library (for Unix to DateTime conversions) | https://github.com/geekfactory/TimeLib |
| JSON library (for parsing received JSON data) | https://github.com/arduino-libraries/Arduino_JSON |
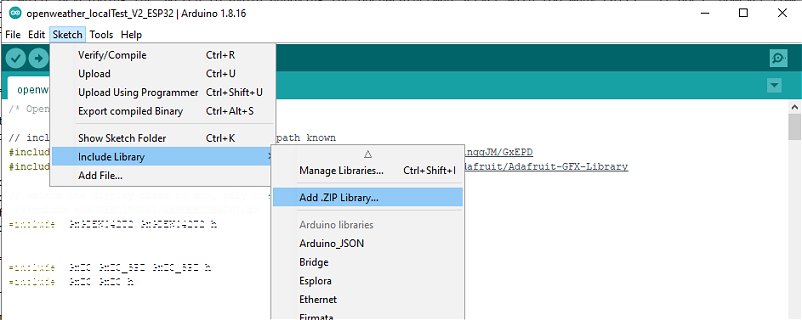
Download the zip files to a suitable folder and then use Sketch -> Include Library -> Add .Zip Library (Or install the libraries using your preferred method.)
The OpenWeather API Key
You need to create an account at OpenWeather to be assigned an Api Key. Sign up here: home.openweathermap.org/users/sign_up
Copy the sketch into the Arduino IDE and edit the openWeatherMapApiKey value which you'll find at line 55 in the sketch.. While you're there, change the following lines:
| Line 44 | #define DEBUGGING true | There's a lot of printing to the Serial Monitor which is useful while debugging the sketch but which wastes time (and battery) once the project is finished. When you're happy with the sketch, change that value to: #define DEBUGGING false and upload the sketch for the last time (possibly!). |
| Line 45 | #define SHOW_LOCAL_TIME true | The monitor will show sunrise, sunset and the time the data was last updated at the OpenWeather server as local time. If you prefer the display to show UTC (GMT), change that to false. |
| Line 47 | #define CONV_FACTOR 1.76 | You can tweak this value to improve the accuracy of the battery voltage measurement. In practice, it tends to drift a bit anyway so it's probably not worth spending too much time on it. |
| Line 49 | #define DST "BST" | 'BST' is British Summer Time. Change this to your local daylight saving time abbreviation. |
| Line 52 Line 53 | String char* ssid = "**********"; String char* password = "**********"; | Your Wifi router SSID Your Wifi router password |
| Line 55 | String char* openWeatherMapApiKey = "**********"; | Your OpenWeather apiKey |
| Line 58 Line 59 | String lat = "53.4"; String lon = "-3.1"; | Change to your Latitude and longitude(from Google maps) |
| Line 61 | String serverPathLocal = ""; | Leave this String empty unless you intend to experiment with a second weather server. |
Download the sketch, bitmaps and fonts package.
The Arduino Sketch