Echo-Dot TV Remote Control
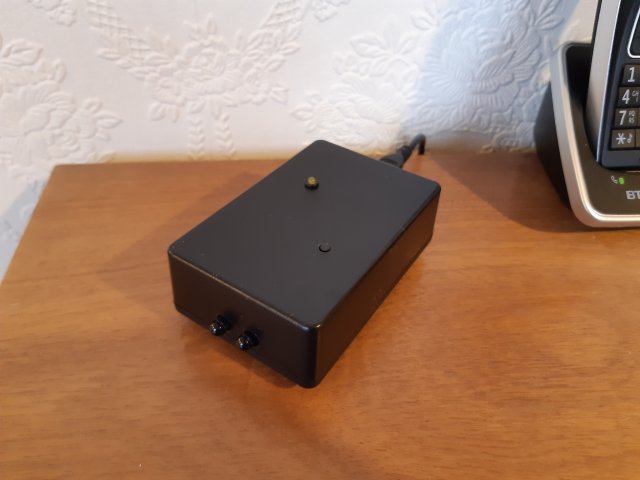
This project allows the Amazon Echo Dot to provide some limited control for a TV by mimicking the codes from the TV's infra red remote.
The Arduino/ESP8266 sketch below shows the infra red codes used by my Samsung TV but it is easily adaptable for other TVs.
The sketch uses the fauxmoESP library that emulates the "Philips Hue" lightling controller so, for the purposes of controlling a TV, all actions must relate to "Alexa, turn on..." or "Alexa, turn off..." (Although the library can handle a request for a percentage value - "Alexa, set the light to 50%" - my TV and its infra red remote have no provision to use this).
For most practical purposes, Turn on... and Turn off... are satisfactory - for example: "Alexa, turn on the TV", "Alexa, turn on BBC 1" etc. For actions such as Up and Down, it's possible to set up "aliases" in the Alexa App using the App's Routines option. For example, "Alexa, channel up" can be translated to "Channel on" which the fauxmoESP library (and Alexa) can understand.
Now you can create Routines by voice. Just tell Alexa the phrase you want to say and the action she should play.
Circuit Diagram
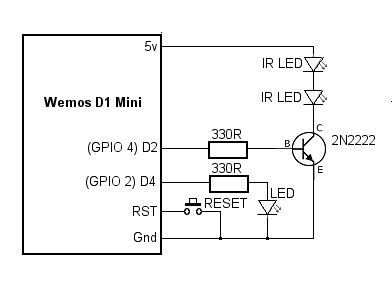
The simple circuit is built around a Wemos D1 Mini ESP8266. Two 5mm blue infra red LEDs are driven in series via a 2N2222 NPN transistor from Wemos OUTPUT D2 (GPIO 4). Note that the positive end of the infra red LED is connected to the 5 volt output on the Wemos D1 mini.
A 3mm LED on D4 (GPIO 2) indicates when the WiFi is connected to the ESP8266. The LED is illuminated at power on and goes out when the WiFi connection to your router is established.
I included a hard Reset button although it probably isn't really necessary.
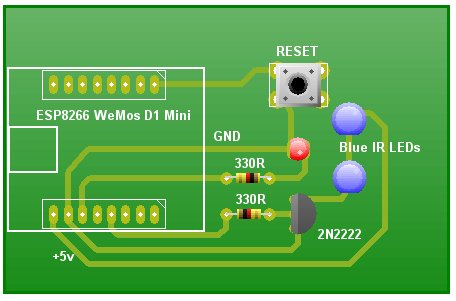
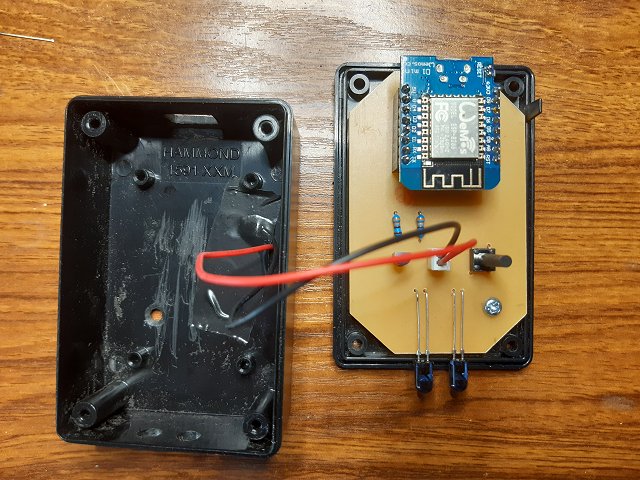
Printed Circuit Board
I recommend that you use two 8-way header sockets for the Wemos D1 Mini rather than soldering the module directly to the PCB: I've found one or two modules from dubious Chinese sources have been faulty and using header sockets makes the module much easier to replace. Also, we need to use the module temporarily to read the IR codes from the TV's normal remote.
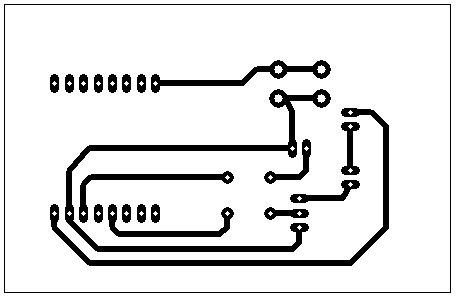
Download PCB Artwork in PDF format.
Setting up the Arduino IDE
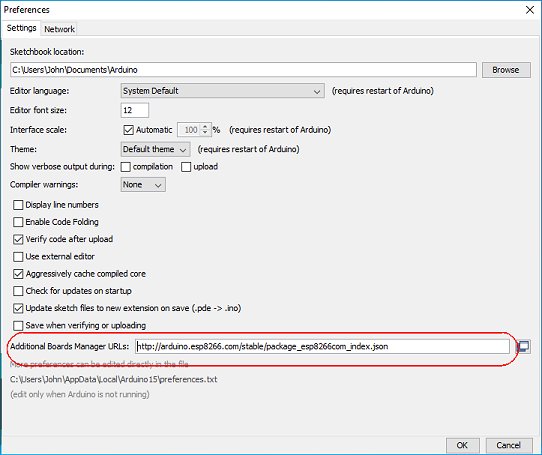
If you haven't used the ESP8266 in the Arduino environment before, it's necessary to install the ESP8266 Board definitions into the Arduino IDE.In the Arduino IDE, select File -> Preferences.
In the Additional Boards Manager URLs text box, enter: http://arduino.esp8266.com/stable/package_esp8266com_index.json then click the OK button.
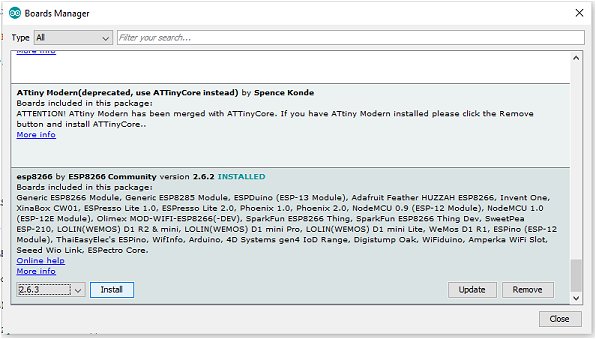
Select Tools -> Board -> Board Manager...
Wait for the platforms index to download then scroll down the list to esp2866 by ESP2866 Community and click Install.
Close the Arduino IDE.
Download and unzip the FauxmoESP Library and install it in the usual way in your Arduino\libraries folder.
Download and unzip the ESPAsyncTCP Library and install it in your Arduino\libraries folder.
While you're installing libraries, download, unzip and install the IRremoteESP8266 library.
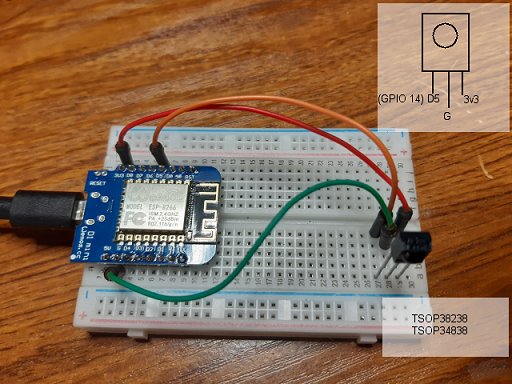
Getting the IR Remote Codes
Before we can go any further, we need to obtain the IR remote codes that we intend to use. Connect a TSOP38238 (or TSOP34838) IR receiver as shown in the photo below and upload IRrevcDumpV2 from File -> Examples -> IRremoteESP8266.
Using your normal TV remote, make a note of the codes from the Arduino Serial Monitor for the remote buttons you intend to use.
Also note the protocol shown on the Serial Monitor. Take a look at the file list in Arduino\libraries\IRremoteESP8266\src\ which lists many protocols.
Copy the Arduino/Echo Dot sketch below and paste it into the IDE.
Find the following two lines near the top of the sketch, edit it to your own WiFi SSID and WiFi Password and upload the sketch to the Wemos D1 Mini.
#define WIFI_SSID "abcdefgh"       // Your WiFi  SSID.
#define WIFI_PASS "*******"      // Your WiFi password.
There is some debugging code in the sketch so open the IDE's Serial monitor and set it to 115200 baud.
Once the code is uploaded, ask Alexa to discover your Fauxmo server and your "devices" - "Alexa, discover devices". Alternatively, in the Alexa App, you can select Settings -> Device Settings and click the '+' sign.
Note that there is an ongoing issue with the latest fauxmoESP library in that the library does not always discover new devices. Please see here for the latest suggestions. I found it may help to roll back to an earlier version of the ESP8266 Board Library in the Arduino Boards Manager. Some suggest using version 2.3.0. There seems to be some trial and error so, hopefully, you'll be able to get it working.
If you experience problems, try adding just two or three devices at first:
const char * devices[] = {          // Define device names for Alexa voice recognition.
   "TV",                            // 0       Because Fauxmo emulates a Philips Hue device, the
   "Horror channel",                // 1       only meaningful commands for Alexa are "Turn On"
   "News 24",                       // 2       and "Turn Off"  (or variants) so some commands
};
The Arduino / Echo Dot Sketch
/*  Limited IR remote control for a Samsung TV via Amazon Echo Dot and Alexa.                                     *
 *  (c) Dec 2019 vwlowen.co.uk.                                                                              *
 *  Based on fauxmoESP examples. Original fauxmoESP comments left in place to assist with modifications. */


#include <Arduino.h>

#include <ESP8266WiFi.h>            //

#include "fauxmoESP.h"              // https://bitbucket.org/xoseperez/fauxmoesp/src/master/
                                    // (Download: https://bitbucket.org/xoseperez/fauxmoesp/downloads/  )

                                    // fauxmoESP requires a support library from:
                                    // https://github.com/me-no-dev/ESPAsyncTCP

                                    // Install both libraries in the usual way in the Arduino\libraries\ folder.

                                    // In Arduino IDE Tools:  LwIP Variant needs to be set to "v1.4 Higher Bandwidth"

                                    // In Arduino IDE Tools | Boards | Board Manager, switch to ESP8266 Board version 2.3.0


#include <IRremoteESP8266.h>        // https://github.com/crankyoldgit/IRremoteESP8266

#include <IRsend.h>

#define CONNECTED_LED 2             // GPIO 2  (WeMos D4). LED OFF when Wifi is connected.

const uint16_t IrLed = 4;           // ESP8266 GPIO pin to use for IR LEDs. Recommended: 4 (WeMos D2).

IRsend irsend(IrLed);               //

#define WIFI_SSID "abcdefgh"       // Your WiFi  SSID.
#define WIFI_PASS "*******"      // Your WiFi password.

const char * devices[] = {          // Define device names for Alexa voice recognition.

   "TV",                            // 0       Because Fauxmo emulates a Philips Hue device, the
   "Horror channel",                // 1       only meaningful commands for Alexa are "Turn On"
   "News 24",                       // 2       and "Turn Off"  (or variants) so some commands
   "Guide",                         // 3       don't sound as natural as others. For example,
   "Mute",                          // 4       "Alexa, turn on the TV" or "Alexa, turn on BBC 1"
   "BBC 1",                         // 5       or "Alexa, turn on the Guide" are acceptable but
   "BBC 2",                         // 6       Channel Up and Channedl Down has to sound a
   "Sky news",                      // 7       bit 'stilted' (but works!) as "Alexa, Channel On"
   "Sound",                         // 8       and "Alexa, Channel Off" (See note).
   "Channel"                        // 9       10 devices (0 - 9) seems to be the maximum that
};                                  //         can be discovered by Alexa (Echo Dot v3).

//  *Note* "Channel on" and "Channel off" can be given 'aliases' - "Channel up" and "Channel down"
//  by setting up two 'Routines' in the Alexa App.  "Alexa, channel up" will be translated to
//  "Channel ON" and "Alexa, channel down" will be translated to "Channel OFF" to send the
//  appropriate IR remote code.


#define numDevices (sizeof(devices)/sizeof(char *))    // Define number of devices in 'devices' array.


// Two variables to hold data received from callback function in setup() for transferring to loop().

volatile int requestedDevice = 0;                      // Variable to hold device ID from callback function.
volatile boolean receivedState = false;                // True/false (On/Off) state from callback function.

fauxmoESP fauxmo;                                      // create fauxmo instance.

// Wi-Fi Connection
void wifiSetup() {
  // Set WIFI module to STA mode
  WiFi.mode(WIFI_STA);

  // Connect
  Serial.printf("[WIFI] Connecting to %s ", WIFI_SSID);
  WiFi.begin(WIFI_SSID, WIFI_PASS);

  // Wait
  while (WiFi.status() != WL_CONNECTED) {
    Serial.print(".");
    delay(100);
  }
  Serial.println();

  digitalWrite(CONNECTED_LED, LOW);

  // Connected!
  Serial.printf("[WIFI] STATION Mode, SSID: %s, IP address: %s\n", WiFi.SSID().c_str(), WiFi.localIP().toString().c_str());
}

void setup() {
  irsend.begin();

  Serial.begin(115200, SERIAL_8N1, SERIAL_TX_ONLY);

  pinMode(CONNECTED_LED, OUTPUT);
  digitalWrite(CONNECTED_LED, HIGH);

  // Wi-Fi connection
  wifiSetup();


  // By default, fauxmoESP creates it's own webserver on the defined port
  // The TCP port must be 80 for gen3 devices (default is 1901)
  // This has to be done before the call to enable()
  fauxmo.createServer(true); // not needed, this is the default value
  fauxmo.setPort(80); // This is required for gen3 devices

  // You have to call enable(true) once you have a WiFi connection
  // You can enable or disable the library at any moment
  // Disabling it will prevent the devices from being discovered and switched

  fauxmo.enable(false);

  fauxmo.enable(true);

  // You can use different ways to invoke alexa to modify the devices state:
  // "Alexa, turn the TV on", "Alexa, turn on TV", "Alexa, TV on"

  // Add virtual devices

  for (int i = 0; i < numDevices; i++) {
    fauxmo.addDevice(devices[i]);
  }


  fauxmo.onSetState([](unsigned char device_id, const char * device_name, bool state, unsigned char value) {
    // Callback when a command from Alexa is received.
    // You can use device_id or device_name to choose the element to perform an action onto (relay, LED,...)
    // State is a boolean (ON/OFF) and value a number from 0 to 255 (if you say "set kitchen light to 50%" you will receive a 128 here).
    // Just remember not to delay too much here, this is a callback, exit as soon as possible.
    // If you have to do something more involved here set a flag and process it in your main loop.

    Serial.printf("[MAIN] Device #%d (%s) state: %s value: %d\n", device_id, device_name, state ? "ON" : "OFF", value);

    // Because there's no way to use the callback function variables in loop(), we assign global variables to the values received.

    // We'll match received device by 'device_id' because it must be faster than comparing character arrays.

    requestedDevice = device_id + 1;     // Returned device_id's start at 0 so we add 1 so we can use 0
                                         // as a 'no device' flag in the main loop.
    receivedState = state;               // state is true or false which we use for IR Remote Up and Down.
  });

}

void loop() {
  // fauxmoESP uses an async TCP server but a sync UDP server
  // Therefore, we have to manually poll for UDP packets
  fauxmo.handle();

  switch (requestedDevice) {                              // Send IR codes. The IR codes and channel numbers
    case 0: break;                                        // shown here are for my TV!

    case 1: irsend.sendSAMSUNG(0xE0E040BF, 32);           // TV on/off
            break;

    case 2: irsend.sendSAMSUNG(0xE0E030CF, 32);           // Horror Channel (70)
            irsend.sendSAMSUNG(0xE0E08877, 32);
            break;

    case 3: irsend.sendSAMSUNG(0xE0E0B04F, 32);           // News 24 (80)
            irsend.sendSAMSUNG(0xE0E08877, 32);
            break;

    case 4: irsend.sendSAMSUNG(0xE0E0F20D, 32);          //  Guide
            break;

    case 5: irsend.sendSAMSUNG(0xE0E0F00F, 32);          // mute
            break;

    case 6: irsend.sendSAMSUNG(0xE0E020DF, 32);          // BBC 1 (1)
            break;

    case 7: irsend.sendSAMSUNG(0xE0E0A05F, 32);          // BBC 2 (2)
            break;

    case 8: irsend.sendSAMSUNG(0xE0E0B04F, 32);          // Sky news(82)
            irsend.sendSAMSUNG(0xE0E0A05F, 32);
            break;
                                                         // state on/off = sound (volume) up/down
    case 9: receivedState ? irsend.sendSAMSUNG(0xE0E0E01F, 32) : irsend.sendSAMSUNG(0xE0E0D02F, 32);
            break;
                                                         // state on/off = channel up/down
    case 10: receivedState ? irsend.sendSAMSUNG(0xE0E048B7, 32) : irsend.sendSAMSUNG(0xE0E008F7, 32);
             break;

  }

  requestedDevice = 0;               // Reset requestedDevice before re-entering loop()

  static unsigned long last = millis();
  if (millis() - last > 5000) {
    last = millis();
    Serial.printf("[MAIN] Free heap: %d bytes\n", ESP.getFreeHeap());
    digitalWrite(CONNECTED_LED,  (WiFi.status() != WL_CONNECTED));

  }
}