This project is an updated version of one of my earlier projects shown here: http://vwlowen.co.uk/arduino/car-battery-monitor2/car-battery-logger.htm.
The original project was always very tight on free memory and updates and improvements to the core Arduino libraries, such as for the SD Card and the Real Time Clock, meant the project eventually failed to run due to insufficient free memory.
This updated project is based on the ATmega1284P which has plenty of spare memory and digital IO. It's not a native IC in the Arduino IDE environment but you'll find easy instructions to add it below.
Most of this article is taken directly from the earlier project - the main changes are to the Digital IO pins (and the corresponding IC pin numbers) and the associated changes to the defined pin numbers in the Arduino sketch.
Car Battery Voltage Logger

My car is fitted with an (eco-friendly?) engine Start-Stop system and Ford's quirky "smart battery charging" both of which make it difficult to power a dash cam based on whether the engine is running.
As there is no simple way to determine if the ignition is "on" (wasn't life simple in the old days!), this unit started life as a way to try to find - and record - a battery voltage that would satisfy the requirement to automatically switch the dash cam on and off.
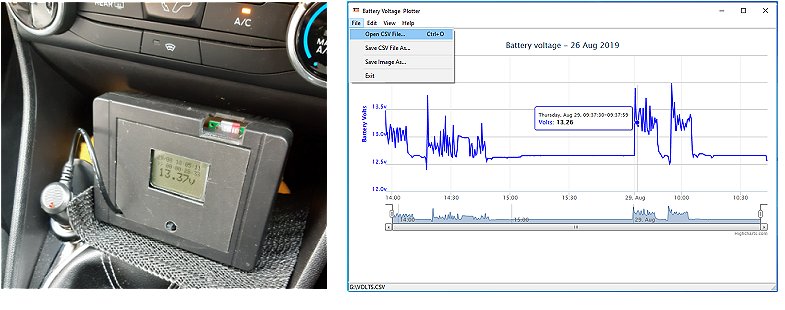
Also, as my car had suffered a failed battery after only two years, I wanted to monitor its smart charging system anyway. So I built this little unit which plugs into the car's 12 volt auxilliary socket to monitor the battery voltage and write the readings to a MicroSD card every five seconds.
The voltage readings, together with the date and time are saved in comma-separated variables (CSV) format so should be reasonably compatible with Microsoft Excel. However, for convenience, I wrote a dedicated Windows program to convert and display the data automatically in a web-based format called Highcharts.
Highcharts licensing requires me to point out that Highcharts software is not free for commercial use but free distribution and use is allowed under their
Non-commercial redistribution policy.
Download Windows Executable Battery Voltage Plotter
Circuit Diagram

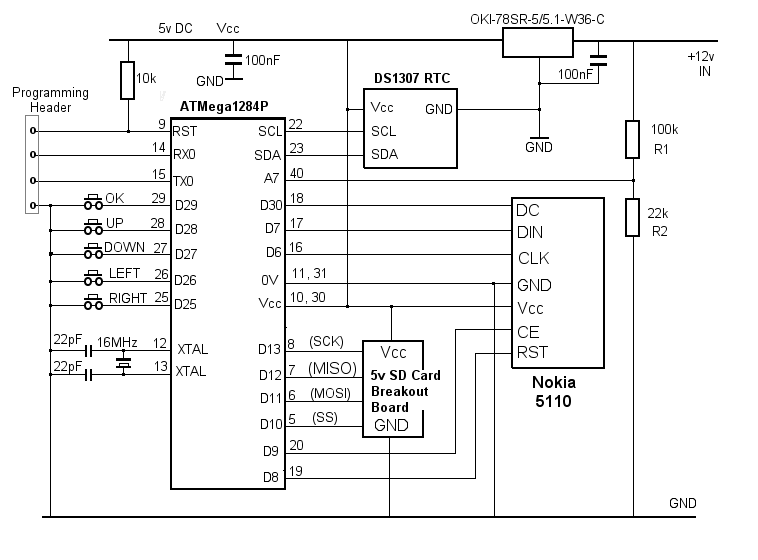
A potential divider consisting of a 100K resistor and a 22K resistor (R1 and R2) is connected across the incoming 12 volt supply from the car's auxiliary socket. The fairly high values are chosen deliberately so as to draw very little current from the battery. The input voltage can be up to 28 volts before the voltage at the junction exceeds the microcontroller's 5 volt limit and no over-voltage protection on the controller's input has proved to be necessary in practice..
The ATmega1284P "measures" the voltage at the junction of R1 and R2 on its analogue input pin A7.
I wanted to record the elapsed time alongside the voltage measurements but it proved difficult to maintain an accurate software-based timer (by using millis() for example) because the unit sleeps for five seconds after each measurement. For this reason, I fitted a Real Time Clock module.
I used a less expensive - and less accurate - DS1307 RTC Module (rather than the DS3231) mainly as I had one in my spares box and the higher cost of the DS3231 was difficult to justify for something that would only be used occasionally. Using the DS1307 did mean that the timekeeping isn't particularly accurate over more than a few days so I included a few push buttons to adjust the date and time easily rather than just setting it in the sketch at compile-time as most example sketches seem to do.
After needing some push buttons anyway, for setting the clock, at least I was able to add some extra functionality to the software - such as controlling how filenames are created for the MicroSD card and the ability to adjust the LCD display contrast. There are plenty of spare IO pins available on the ATmega1284P so it would be easy to include a switchable LCD backlight.
The setting menu is accessed by pressing the centre button on a 5-way navigation switch. As the software is likely to be somewhere in its 5-second sleep mode, it may be necessary to hold the button for up to five seconds before the display clears. After releasing the button, the menu appears on the LCD. The Low Power Arduino library that I used has the option for "timed sleep" or "interrupt wake" but not both. I chose "timed sleep" for simplicity.
I used a "5 volt ready" MicroSD card breakout board from Adafruit as I already had one in my spares box. Although the entire project could run at 3.3 volts (enabling the use of a "bare" SD card holder without level-shifting), the reduced voltage range available for the analogue input may affect the accuracy.
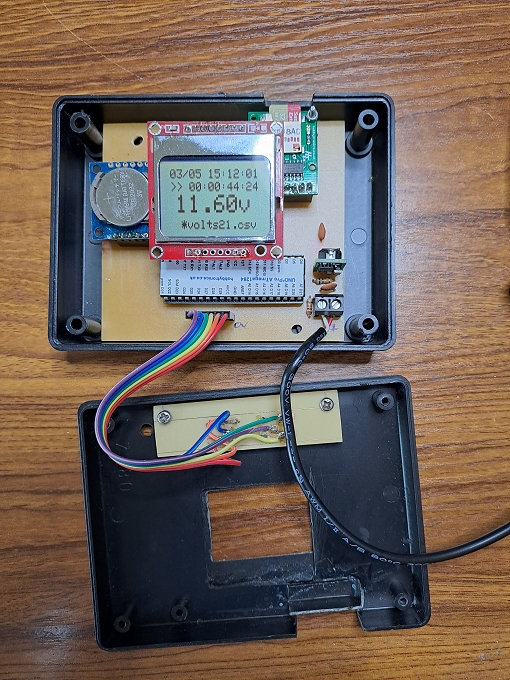
Unlike the Arduino SD card example sketches, which halt if no SD card is detected, the sketch below allows the software to continue. This lets the unit act as a simple voltage monitor - "NO SD CARD!" is displayed on the LCD screen along with the measured voltage, the current date & time and the elapsed time. When a MicroSD card is detected at power-up, "NO SD CARD!" is replaced with the filename currently being written to. If an SD card is inserted after power-up, it's necessary to power off and on again for the card to be detected and to reset the elapsed time.
When asleep, the circuit takes about 900µA thanks to the low quiescent current taken by the OKI-78SR-5/5.1-W36C voltage regulator which supplies 5 volts to the circuit. My car continues to take about 35mA from the battery when it's locked - due to its on-board computer, the alarm and the remote key's receiver - so an extra 1mA wasn't considered excessive.
The 12 volt auxilliary socket shuts off its power anyway about 30 minutes after the car is locked. To log the voltage over a longer period would need the monitor to be connected directly across the battery - in which case it would be advisable to include a fuse. The plug that I used for the auxilliary socket has its own fuse so I haven't shown one on the circuit diagram.
Printed Circuit Board
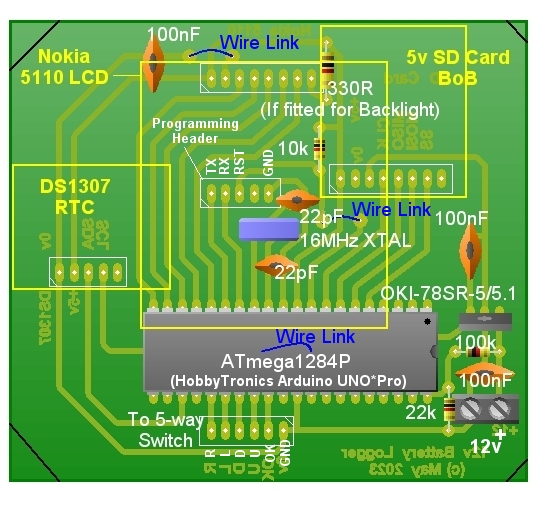
The socket for the programmer is under the LCD and connects to a USB-RS232 programming lead - such as this one


Arduino Sketch
To enter the setting menu, the 'OK' button (connected to digital pin D29) needs to be held down for up to 5 seconds in case the ATmega1284Pis in its 5-second sleep mode.
Once the menu is displayed, the UP and DOWN buttons select Set Clock, Set Contrast, One File, Multi File or Exit.
After resetting the clock, the sketch will also reset the elapsed time to zero (and start a new filename if Multi File is selected).
If One File is selected, the data is always appended to the MicroSD card with the same filename - volts00.csv
If Multi File is selected, a new filename is created each time the unit is restarted - ranging from volts00.csv
to volts99.csv
An asterisk (*) is displayed alongside the filename on the main display when Multi File is selected.
The unit can be used as a simple voltage monitor without the MicroSD card, in which case NO SD CARD! is shown on the LCD display.
The accuracy of the measured voltage can be fine tuned by adjusting the values in the following lines in the sketch:
const float Vref = 5.00;                // Actual voltage and resistor values can be set here.
const float R1 =  100950.0;             // R1 is nominally 100000.0
const float R2 =   22000.0;             // R2 is nominally 22000.0
The ATmega1284P (complete with bootloader) is available from HobbyTronics together wih full details of adding the ATmega1284P hardware to the Arduino IDE and editing the Arduino boards.txt file.
Note: Various options for programming the AT1284P are shown here: http://www.technoblogy.com/show?19OV
Additional Libraries:
/*  Car Battery Voltage Logger - vwlowen.co.uk
 *  -------- ATMega1284P --------
 */

#include <SD.h>
#include <EEPROM.h>                     // Nokia LCD contrast setting is saved in EEPROM.

#include  "LowPower.h"                  // Used for "sleep" funtion.

#include "RTClib.h"                     // Real Time Clock library.

#include <Adafruit_GFX.h>
#include <Adafruit_PCD8544.h>

#define RST 8                              // Define pins for Nokia 5110 LCD
#define CE  9                             //
#define DC 30                              //
#define DIN 7
#define CLK  6

#define SD_CS   10                      // Standard SPI Chip Select.

#define Vin A7                          // Analogue pin A7 measures volts at junction R1 and R2.

#define OK 29                            // Input pins for clock- and contrast-setting buttons.
#define UP 28                            // I used a 5-way tactile navigation switch.
#define DOWN 27
#define LEFT 26
#define RIGHT 25


const float Vref = 5.00;                // Actual voltage and resistor values can be set here.
const float R1 =  100950.0;             // R1 is nominally 100000.0
const float R2 =   22000.0;             // R2 is nominally 22000.0
const float resDiv = (R2/(R1 + R2));    // Resistor divider factor applied to measured voltage.

Adafruit_PCD8544 lcd = Adafruit_PCD8544(CLK, DIN, DC, CE, RST);

RTC_DS1307 rtc;


File myFile;

char fileName[] = "volts00.csv";             // DON'T EXCEED THE 8.3 FILENAME FORMAT. MUST END
                                             // WITH "." + 3 CHARACTERS.

bool SDCard = true;                          // Flag if SD card is present and OK.
bool multiFiles = false;

unsigned long startSeconds;                  // Unix timestamp for start time of test.

void(* resetFunc) (void) = 0;                // Declare reset function at address 0. Calling this
                                             // function re-starts the microcontroller.

int contrast = 45;                           // Default contrast setting to Nokia LCD.

void setup() {
  pinMode(RST, OUTPUT);                      // Define pins for Nokia LCD as OUTPUTS.
  pinMode(CE, OUTPUT);
  pinMode(DC, OUTPUT);
  pinMode(DIN, OUTPUT);
  pinMode(CLK, OUTPUT);

  pinMode(SD_CS, OUTPUT);

  pinMode(Vin, INPUT);                       // Set A7 as INPUT to read battery voltage.

  pinMode(OK, INPUT_PULLUP);                 // Buttons to set clock and navigate menu.
  pinMode(UP, INPUT_PULLUP);
  pinMode(DOWN, INPUT_PULLUP);
  pinMode(LEFT, INPUT_PULLUP);
  pinMode(RIGHT, INPUT_PULLUP);


  rtc.begin();                                          // Initialize RTC
  //rtc.adjust(DateTime(2023, 4, 30, 15, 10, 0));       // Set date and time

  contrast = constrain(EEPROM.read(0), 30, 60);

  lcd.begin(contrast);                                  // Initialize Nokia display

  lcd.clearDisplay();
  lcd.display();

  multiFiles = constrain(EEPROM.read(1), 0, 1);


  if(!SD.begin(SD_CS)) {
    SDCard = false;                                     // Set 'No SD Card' flag if necessary.
  } else {

   if (multiFiles) {
      while (myFile = SD.open(fileName)) {                // Find an unused filename...
        if (fileName[sizeof(fileName) - 6] != '9') {      // "volts00.csv"  to "volts99.csv"
          fileName[sizeof(fileName) - 6]++;               //
        } else                                            //

        if (fileName[sizeof(fileName) - 7] != '9') {
          fileName[sizeof(fileName) - 7]++;
          fileName[sizeof(fileName) - 6] = '0';
        }
        myFile.close();
      }
    }
    myFile = SD.open(fileName, FILE_WRITE);                     // Open SD card for WRITE
    if (myFile) {
      myFile.rewindDirectory();
      myFile.println(F(" "));                                   // Blank line.
      myFile.println(F("DD/MM/YYYY HH:MM:SS,Battery Volts"));   // Write header to SD card
      myFile.close();
    }
 }

 DateTime now = rtc.now();
 startSeconds = now.unixtime();               // Use unix timestamp (seconds) for start time.

}


void loop() {

 DateTime now = rtc.now();                    // Read RTC.

 int years = now.year();                      // Get date and time from RTC to
 int months = now.month();                    // display on LCD and write to SD card.
 int days = now.day();

 int hours = now.hour();
 int mins = now.minute();
 int secs = now.second();

 int raw = 0;                                // Get voltage at R1-R2 junction.
 for (byte i=0;i<10;i++) {
    raw += analogRead(Vin);
    delay(10);
 }
 raw = raw / 10;
 float volts = (raw / 1024.0) * Vref;
 volts = (volts / resDiv);

 unsigned long diff = now.unixtime() - startSeconds;

 unsigned long diffSec = diff;                         // Calculate difference between start time and now.
 unsigned long diffMin = diffSec / 60;
 unsigned long diffHour = diffMin / 60;
 unsigned long diffDay = diffHour / 24;

 diffSec = diffSec % 60;
 diffMin = diffMin % 60;
 diffHour = diffHour % 24;


 lcd.clearDisplay();                          // Print the current date & time on the LCD
 lcd.setTextSize(1);
 if (days < 10) lcd.print(F("0"));
 lcd.print(days);
 lcd.print(F("/"));
 if (months < 10) lcd.print(F("0"));
 lcd.print(months);
 lcd.print(F(" "));
 if (hours < 10) lcd.print(F("0"));
 lcd.print(hours);
 lcd.print(F(":"));
 if (mins < 10) lcd.print(F("0"));
 lcd.print(mins);
 lcd.print(F(":"));
 if (secs < 10) lcd.print(F("0"));
 lcd.print(secs);

 lcd.setCursor(0, 10);
 lcd.print(F(">>"));                           // Print the time lapsed on the LCD
 if (diffDay < 100)
   lcd.print(F(" "));

 if (diffDay < 10) lcd.print(F("0"));
 lcd.print(diffDay);
 lcd.print(F(":"));
 if (diffHour < 10) lcd.print(F("0"));
 lcd.print(diffHour);
 lcd.print(F(":"));
 if (diffMin < 10) lcd.print(F("0"));
 lcd.print(diffMin);
 lcd.print(F(":"));
 if (diffSec < 10) lcd.print(F("0"));
 lcd.print(diffSec);


 lcd.setTextSize(2);
 lcd.setCursor(5, 20);
 lcd.print(volts, 2);                         // Print voltage on LCD in large text.
 lcd.print(F("v"));
 lcd.setTextSize(1);

 if(!SDCard) {                                // If no SD Card, show warning on LCD.
   if (multiFiles) {
     lcd.drawLine(4, 39, 81, 39, BLACK);
   } else
     lcd.drawLine(4, 39, 75, 39, BLACK);
   lcd.setCursor(4, 40);
   lcd.setTextColor(WHITE, BLACK);            // white text on black background.
   if (multiFiles) {
     lcd.print(F(" *"));
   } else
     lcd.print(F(" "));
   lcd.print(F("NO SD CARD!"));
   lcd.setTextColor(BLACK);                   // black text colour.
 } else {
   lcd.setCursor(4, 40);
   if (multiFiles) {                          // Otherwsise, show current filename.
     lcd.print(F(" *"));
   } else
     lcd.print(F(" "));
   lcd.print(fileName);
 }
 lcd.display();


                                            // write data to SD card as DD/MM/YYYY HH:MM:SS,VOLTS
 if (SDCard && (volts > 1.0)) {
   myFile = SD.open(fileName, FILE_WRITE);
   if (myFile) {
     myFile.print(days);
     myFile.print(F("/"));
     myFile.print(months);
     myFile.print(F("/"));
     myFile.print(years);
     myFile.print(F(" "));
     myFile.print(hours);
     myFile.print(F(":"));
     myFile.print(mins);
     myFile.print(F(":"));
     myFile.print(secs);
     myFile.print(F(","));
     myFile.println(volts, 2);
     myFile.close();                       // Close the file.
   }
 }


 LowPower.powerDown(SLEEP_4S, ADC_OFF, BOD_OFF);        // Sleep for  5 seconds.
 LowPower.powerDown(SLEEP_500MS, ADC_OFF, BOD_OFF);


 if (digitalRead(OK) == LOW) {                          // Upon waking, check for OK button press.
  byte lp = 0;                                          // loop control. If lp is 0, stay in loop.
  int y = 0;                                            // Start with cursor on top menu item.
  lcd.clearDisplay();                                   // Clear display to indicate "awake"
  lcd.display();
  while (lp == 0) {

    while(digitalRead(OK) == LOW);                      // Wait for OK button to be released
    delay(100);

    while (digitalRead(OK) == HIGH) {
      lcd.clearDisplay();                               // Position cursor at first line
      lcd.setCursor(0, y);                              // and list Menu options.
      lcd.print(F(">"));
      lcd.setCursor(11, 0);
      lcd.print(F("Set Clock"));                        // Set Clock
      lcd.setCursor(12, 10);
      lcd.print(F("Set Contrast"));                     // Adjust LCD contrast
      lcd.setCursor(11, 20);
      lcd.print(F("One File"));                         // Always use one file (volts00.csv)
      if (!multiFiles) lcd.print(F(" *"));
      lcd.setCursor(11, 30);
      lcd.print(F("Multi File"));                      // Increment filename each power-up.
      if (multiFiles) lcd.print(F(" *"));
      lcd.setCursor(11, 40);
      lcd.print(F("Exit"));
      lcd.display();
      if (digitalRead(DOWN) == LOW) {                   // Mover cursor up/down
        y += 10;
        if (y > 40) y = 0;
        delay(250);
      }
      if (digitalRead(UP) == LOW) {
        y -= 10;
        if (y < 0) y = 40;
        delay(250);
      }
    }
    switch (y) {                                   // Select option depending on cursor position
      case 0:  adjustClock(); break;
      case 10: setLCDContrast(); break;
      case 20: multiFiles = false; EEPROM.update(1, multiFiles); break;
      case 30: multiFiles = true;  EEPROM.update(1, multiFiles); break;
      case 40: lp = 1; delay(250); break;
    }
  }
 }

}

// Function to set the RTC.

void adjustClock() {

  while (digitalRead(OK) == LOW);                       // Wait for "Set Clock" button to be released.
  delay(100);

 DateTime now = rtc.now();               // Read RTC.

 int y = now.year();                     // Get date and time from RTC.
 int m = now.month();                    //
 int d = now.day();

 int h = now.hour();
 int mm = now.minute();
 int s = now.second();


  while(digitalRead(OK) == HIGH) {                      // Display current YEAR value first.
    lcd.clearDisplay();                                 // LCD can't display full date & time
    lcd.setCursor(0, 10);                               // on one line so get year out of the way.
    lcd.print(F("Set Year "));
    lcd.print(y);
    if (digitalRead(UP) == LOW) {                       // Increase year value if UP is pressed
      y++;
      delay(200);
    }
    if (digitalRead(DOWN) == LOW) {                     // Decrease year value if DOWN is pressed.
      if (y >= 2019) y--;
      delay(200);
    }
    lcd.display();
  }

  while (digitalRead(OK) == LOW);
  delay(300);


  int x = 0;                                            // Cursor horizontal position
  while(digitalRead(OK) == HIGH) {                      //

    if (digitalRead(RIGHT) == LOW) {                    // RIGHT pressed: increment
      x += 18;                                          // cursor position in steps of 18.
      if (x > 72) x = 0;
      while(digitalRead(RIGHT) == LOW);
    }

    if (digitalRead(LEFT) == LOW) {                     // LEFT pressed: decrement
      x -= 18;                                          // cursor position in steps of -18
      if (x < 0 ) x = 72;
      while (digitalRead(LEFT) == LOW);
      delay(150);
    }


    lcd.clearDisplay();                                 // Display current date & time.
    lcd.setCursor(0, 0);
    if (d < 10) lcd.print(F("0"));                      // sprintf would be good here to format
    lcd.print(d);                                       // the values but it uses too much dynamic
    lcd.print(F("/"));                                  // memory and causes a write problem with
    if (m < 10) lcd.print(F("0"));                      // the SD card.
    lcd.print(m);
    lcd.print(F(" "));
    if (h < 10) lcd.print(F("0"));
    lcd.print(h);
    lcd.print(F(":"));
    if (mm < 10) lcd.print(F("0"));
    lcd.print(mm);

    lcd.print(F(":"));
    if (s < 10) lcd.print(F("0"));
    lcd.print(s);

    lcd.drawLine(x, 10, (x + 10), 10, BLACK);           // Draw cursor underneath at x position.

    if (digitalRead(UP) == LOW) {                       // UP pressed: Increment either day, month
      switch (x) {                                      // hour, minute or second, depending upon
        case 0:  d < 31 ? d++ : d = 1; break;           // cursor position.
        case 18: m < 12 ? m++ : m = 1; break;
        case 36: h < 23 ? h++ : h = 0; break;
        case 54: mm < 59 ? mm++ : mm = 0; break;
        case 72: s < 59 ? s++ : s = 0; break;
      }
    delay(200);
    }
    if (digitalRead(DOWN) == LOW) {                     // DOWN pressed: Decrement either day, month
      switch (x) {                                      // hour, minute r second, depending upon
        case 0:  d > 1 ? d-- : d = 31; break;           // cursor position.
        case 18: m > 1 ? m-- : m = 12; break;
        case 36: h > 0 ? h-- : h = 23; break;
        case 54: mm > 0 ? mm-- : mm = 59; break;
        case 72: s > 0 ? s-- : s = 59; break;
      }
      delay(200);
    }
    lcd.setCursor(0, 25);
    lcd.print(F("OK to Restart"));
    lcd.display();
  }

  rtc.adjust(DateTime(y, m, d, h, mm, s));         // Set date and time
  while (digitalRead(OK) == LOW);
  delay(100);
  resetFunc();                                     // Restart because elapsed time may have changed.
                                                   // This will create a new filename.
}


void setLCDContrast() {

 // Adjust LCD contrast, if required, and save in EEPROM.

 while(digitalRead(OK) == LOW);
 while(digitalRead(OK)== HIGH) {
  lcd.clearDisplay();
  lcd.setCursor(0, 5);
  lcd.print(F("Contrast Test"));
  lcd.setCursor(0, 16);
  lcd.print(F("UP/DOWN to set"));
  lcd.setCursor(0, 35);
  lcd.print(F("OK to Quit"));
  lcd.display();
  if(digitalRead(UP) == LOW) contrast++;
  if(digitalRead(DOWN) == LOW) contrast--;
  contrast = constrain(contrast, 30, 60);
  lcd.setContrast(contrast);
  delay(200);
 }
 EEPROM.update(0, contrast);
}
