Download iCam Basic (File size: 480kB)
Note: Windows Server 2008 Users will need to enable the 'Desktop Experience' features (in particular, Windows Media Player). http://support.microsoft.com/kb/947036.
Introduction
I wrote iCam Basic in response to requests to provide a simple method for people to put a video stream on their websites even if their ISP doesn't provide them with a fixed, static, IP address. I've kept it as simple as possible but it should work with most Windows-compatible video sources such as USB webcams and AV video capture cards.

What You Will Need To Know
You will, obviously, need to have a website and you will need to be able to upload pages to it using the FTP protocol.
If you already have a website, you will, hopefully, already know how to do this. If someone normally maintains the website
for you, you will need the following pieces of information:
- The website's FTP server name.
- The username and password needed to access your webpages.
Adding Video To A Webpage
If you already have a webpage to which you wish to add the video image, you simply need to add the code shown below at
the appropriate place on the page. If you are starting a new page from scratch, template.htm included with the
iCamBasic distribution is a starting point. This page will act as a template for the final HTML file.
Highlight the text below then right-click and select 'Copy'. The text can then be Pasted into your own web page code.
<object id="mediaPlayer"  width=320 height=258
 classid="CLSID:22d6f312-b0f6-11d0-94ab-0080c74c7e95"
 codebase=
  "http://activex.microsoft.com/activex/controls/mplayer/en/nsmp2inf.cab#Version=6,4,5,715"
 standby="Loading Microsoft Windows Media Player components..."
 type="application/x-oleobject">

 <param name="FileName" value="http://{IP}/">
 <param name="AutoStart" value="true"/>
 <param name="ShowControls" value="0"/>
 <param name="ShowStatusBar" value="1"/>
 <param name="ShowDisplay" value="false"/>
 <Embed type="application/x-mplayer2"
           pluginspage="http://www.microsoft.com/Windows/MediaPlayer/"
           width=450
           height=365
           src="http://{IP}/"
           id=MediaPlayer
           Name=MediaPlayer
           AutoStart=1
           ShowControls=0
           ShowStatusBar=1
           ShowPositionControls=0
           ShowTracker=0
           autoSize=0
           DisplaySize=4>
</embed>
</object>
Note the text {IP}, above, which I've highlighted in blue. iCam Basic will automatically replace this text with your true Internet IP address before uploading the page to your website.
Configuring iCam Basic
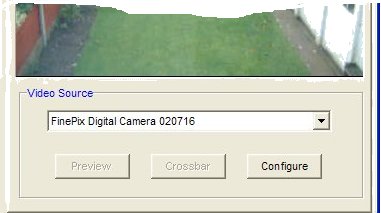
Connect your video source, such as a webcam, to your computer, then open iCam Basic and the name of your video source should be shown in the box below the video window. If you have more than one camera connected to your computer, you will need to select which one you want to use and click the Preview button.
Click on 'Website' in iCam Basic's left-hand panel to open the website configuration page.
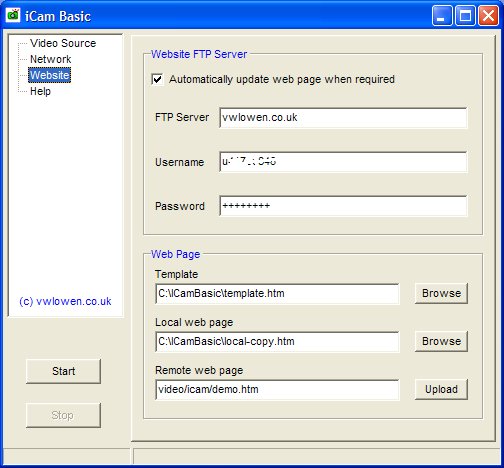
Check the checkbox and enter the details for your website's FTP server together with your Username and Password.
Use the Browse button to browse for the template file you created earlier and also give a filename for the local copy of the page which will be automatically created later.
In the Remote web page text box, type the name the page will have when it is uploaded onto your website. Include any website subfolders, if necessary. For example video/icam/demo.htm
Configuring Your Router
That's all the configuration that iCam Basic needs but, if you are using a broadband router to connect to the
internet, you will need to read the section Working behind a router
That's It!
When you click iCam Basic's Start button, there will be a short delay, then your internet IP address should
appear in the left hand end of the StatusBar. About 5 seconds later, the StatusBar should display a brief message that it is
uploading the webpage to your website. Your IP address will be monitored automatically every 15 minutes and, if it should
change for any reason, an updated webpage will be uploaded automatically.
The local copy will also be updated if required. If you are using an internal or USB modem, the IP address in the local copy will be the same as your Internet IP address. If you are using a router, the IP address in the local copy will be your LAN address which is less likely to change.
Download iCam Basic (File size: 480kB)