Picaxe BASIC has built-in commands for use with the DS18B20 digital temperature sensor from Maxim.
readtemp pin, variable will read the temperature from the sensor connected to input 'pin' and store the value in the byte 'variable'. Although a full 12-bit reading is obtained from the sensor, the value is rounded to the nearest full degree Celcius.
readtemp12 pin, word-variable returns the full 12-bit value into a word variable.
The DS18B20 is capable of reading temperatures between -55°C and +125°C and is accurate to ±0.5°C over the range of -10°C to +85°C. Negative values are represented by setting bits 11 and 12 high (1). The PicAxe software is responsible for correctly interpreting the returned value.
There is a good example to be found at Peter Anderson's website so there's no need to repeat it here.
The Connections
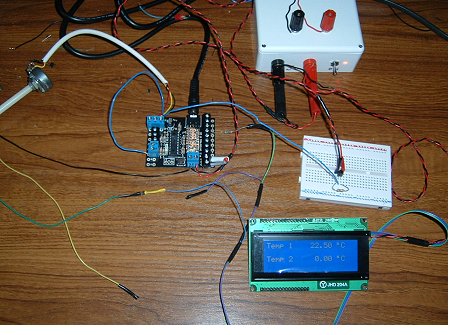 This photo shows the connections between a Picaxe 18M2 project board (with the darlington driver IC removed from the outputs), a
DS18B20 on a breadboard and a serial LCD to display the temperature. The white box at the top is my 12v DC in to 5v DC out regulated
power supply which seems to keep sprouting additional 5v out terminals!
This photo shows the connections between a Picaxe 18M2 project board (with the darlington driver IC removed from the outputs), a
DS18B20 on a breadboard and a serial LCD to display the temperature. The white box at the top is my 12v DC in to 5v DC out regulated
power supply which seems to keep sprouting additional 5v out terminals!
The wiring isn't quite as haphazard as it may appear! Throughout the bits and pieces I use for experimenting I've tried to use a colour scheme for the wiring based on something suggested by Ron Hackett in his excellent book "Picaxe Microcontroller Projects for the Evil Genius".
My first impression when I read his suggestion was that it was silly but I must admit that the mnemonics he's used actually work!
Red and Black are fairly obvious as +5v and Ground. But whenever data has to move from one place to another (PicAxe to serial LCD, Picaxe to PC, LCD to PC, etc) I use a Yellow wire when data is passing OUT of a device and a Green wire for data passing IN to a device. Why? Well, Ron Hackett's mnemonics are simple: It's "IN" to be Green. And we Yell "OUT". -- The daft thing is, they actually work - at least they do fo me!
When there's a single piece of wire between two devices, it obviously doesn't make any sense to change the colour of the wire
halfway along (what's "out" for one device is "in" for the other) but, for devices that have their own "flying leads" and will plug into one another, the colour scheme mnemonics
work well and save having to constantly refer to connection numbers and data sheets to remember which wire is which.
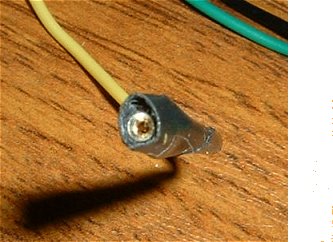 I've attached tiny sockets to each flying lead from my devices. They're actually single
turned-pin sockets snapped from a strip. This one is attached to a yellow cable which goes to the PC's serial port and I can immediately see
from its colour that it's....... Data OUT (ie Tx). when I want to join two wires together (it will be yellow to green), I make
one socket into a male pin by inserting a short cut off piece of component lead.
I've attached tiny sockets to each flying lead from my devices. They're actually single
turned-pin sockets snapped from a strip. This one is attached to a yellow cable which goes to the PC's serial port and I can immediately see
from its colour that it's....... Data OUT (ie Tx). when I want to join two wires together (it will be yellow to green), I make
one socket into a male pin by inserting a short cut off piece of component lead.
It seems a little odd joining wires of different colours but, by keeping the colours correct from the "perspective" of
each device, the's no confusion.
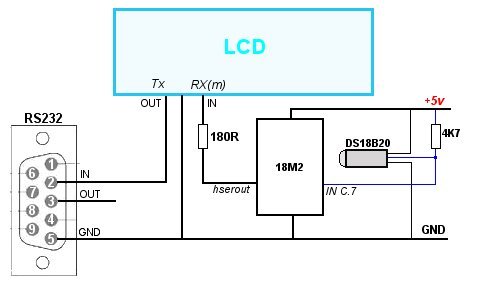
The ByVac 20x4 IASI-2 Serial LCD module has two serial input pins. One is at RS232 signal and polarity levels. The second, at Microcontroller signal polarity is the one used in this circuit. By setting up the picaxe hsersetup command correctly, the output from the LCD can be connected to the PC's RS232 port in order to monitor any responses from the LCD on a terminal program - although this is totally unnecessary once everything is working ok. ByVac supply lots of useful software free of charge and seem to be a good, reliable supplier.
The Code
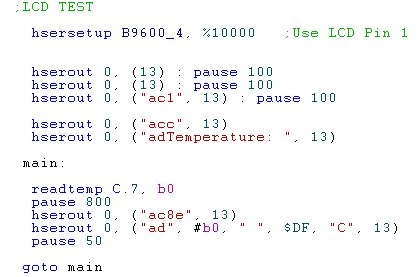
I use the Picaxe's hardware serial pins (hserin, hserout) in preference to using virtually any other pin (for serin and serout) simply because the LCD's minimum baud rate is 9600 Bd which is higher than the Picaxe's default maximum baud rate. Although it's easily possible to increase the Picaxe chip's baud rate, it needs a software command to increase the chip's operating speed and, as that has some other knock-on effects to other commands, I think it's better to keep the Picaxe code as simple as possible while I'm experimenting.